Colour Blocked Photo Backdrop DIY (in 2 colours!)
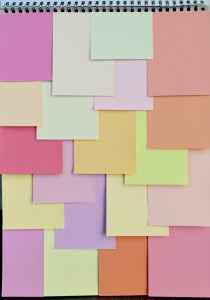
One of my goals for the blog this year was to improve my photography skills. While I was pretty confident in my ability to compose a photo, I knew that there were some areas that were lacking such as lighting and styling of the photo. The lighting has been drastically improved, as we now have huge windows in the apartment that let in a ton of natural light. The styling was a bit harder, though. As always, I turned to Pinterest to try and find some inspiration for styling my photos. I saw a blog post of an Easter brunch from Paper & Stitch that featured a photo of flowers in front of this colour blocked kind of backdrop. The flowers were in the foreground, and in the background, there was what looked like a wall that was pieces of paper painted in a solid colour. It is pieces of canvas painted different colours - and I loved the look of it. The full post can be found here. I was inspired to create my own photo backdrop using that as inspiration!
I loved the overlapping look of the backdrop, but I didn’t want to spend all that time painting paper. Enter Color Aid paper! I received this paper as part of my fashion kit when I went to school for design. The colour aid paper is this block of 4×6 pieces of paper that are all a different colour and have a naming system on the back. We used them for some exercises in class, but didn’t even make a dent in the large selection of colours.
I’ve been trying to use up these papers because a) they come in so many beautiful colours, and b) part of me just wants to get rid of them. In short, this ended up being the perfect project. I also was able to use both sides of the cardboard from my watercolour pad, which saves on having to buy a backboard!
This project comes together pretty quickly - especially if you have paper that size. This would also be a great project for any scrap paper that you have. You can play around with the backdrops and do different patterns or colours. Even try ripping the edges of the paper to get some texture in there. Do whatever will work for your style of photos.
I want my photos to have a more bright, clean look to them, so I went with light pastel tones with crisp edges. I also wanted to be able to use the backdrop for different moods. Here’s how I did it:
Colour Blocked Photo Backdrop DIY
Time: 1 hour
Difficulty: Very Easy
Cost: Minimal
Supplies
- approx 30 pieces coloured paper in a colour way of your choice measuring approx 4×6″ (double if you want to do 2 colour ways like I did)
- masking tape
- an exacto knife
- a ruler
- a piece of sturdy cardboard sized 16 x 20 ( I used the cardboard backing from my watercolour pad of paper to save some money)

Method
- Buy or go through your collection of paper and divide the papers into two piles - cool colours (blues, greens, teals & purples) and warm colours (pinks, red, yellows and oranges)

- Set aside your warm colours. Take your cardboard and start to arrange the cool coloured papers beginning at the bottom.
- Work your way up to the top. Try to spread out the different tones so that you don’t get a big clump of blues together. Mine were all slightly different tints, but if you bought paper and cut it to the 4×6″ size, you’ll have some duplicates.


- Once you reach the top, have a look at your layout and see if you like the positioning. Move around any pieces of paper that you feel are out of place.
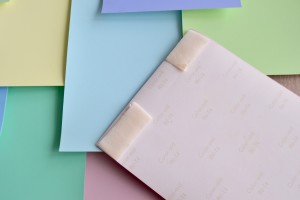
- Once you are happy with the order, start by taping down the bottom row.

- Put all the papers up slightly except for the bottom row and tape them down in the order that you placed them
- Continue moving up the board like this, taping as you go
- Once you get to the top, you can trim off any excess that hangs over the top of your board.

- The end result might come out slightly different than your original plan, but it will still look great.
- Repeat for your warm colour palette on the back of the cardboard.


Voila! You now have 2 different photo backdrops to use for stylized photos.
I plan on using my photo backdrop for a lot of food photography. In fact, I used the cool backboard for some adorable little cakes that I cannot wait to share with you soon!


I find that a photo backdrop like this is really good for taking macro shots of an object in the foreground. By doing that, the background starts to blur, and you get a really interesting mix of colours in your photo that adds some visual interest.

Hopefully this helps to inspire you to create some photo back drops of your own for better photography!
xo, tess.


This is so great! As soon as I got to your photos with the backdrop, I was stunned. Thanks for sharing! I’m definitely going to give this a try.
Thanks so much Liz! I’d love to see some of your photos if you make them 🙂
I love this! Very useful for blogging images and I think could work very well with Etsy shops, too!
Thank you Shanna! That’s a great idea to use them for an Etsy shop 🙂
I’m looking to make a backdrop for photography too, this post is perfect.. I’m thinking different shades of white for a clean neutral background. Thanks for inspiring me!
Thank you Cynthia! That’s also a great idea! you’ve got me thinking that pure white papers with ripped edges would be nice to add some texture 🙂 Love the freshness of a nice white background!!
What a great idea for a project. It looks great behind the potted cactus.
Thank you Dave!
What a great idea! I have been wondering what I can do to make a backdrop. I have so much colored paper I will being giving this a try for sure! Thank you!
Thank you Joce! That’s great 🙂 I love when you’re able to use things you already have on hand for a project!
this is such a great idea, thanks for sharing!
Thank you Madi 🙂
How creative, I love this! So simple and effective - I’m studying photography atm, so loving this idea!
Thank you Amy! That’s awesome, photography was one of my favorite classes in university 🙂
This is so creative! I love it! Gorgeous colors and such an easy process. So awesome.
xoxo,
Dannie
http://www.stilefotocibo.com
Thank you so much Dannie!
Such a cute idea! love it!
~Anna http://www.pepperedinstyle.com
Thank you Anna!!
Great! The fact that everything is done hands, deserves respect. Now because everything on the computer used to do 🙂 Keep it up!
Thank you Klauss! 🙂
great idea. I love all the different colours.
Thank you so much Sarah, me too!!
Love this idea! I am a hobby artist, and I’m always looking for new things to experiment with. I will definitely be experimenting with this! I’ve also never thought about creating something just to use as a backdrop for photos. As I write my blog, I’ve been trying to figure out how to give my photos look a bit more oomph. Great look!
Thank you so much Jean-Marie! I hadn’t thought of creating back drops for blog photos until recently either!
This is really cool 🙂 I love to try this my kids help. So much fun to do like this project with kids 🙂
Thank you so much Uma! I’m sure kids would love this project 🙂
Such a great idea, so creative!
Thank you so much Jennifer 🙂
This is a really cool idea, I’m gonna have to try it out
Thank you so much 🙂
How fun! I love that it has a bit of a 3D look!
-Jen
http://www.asipofbliss.com
Thank you so much Jen!
This is such a great idea, I may just have to steal it 🙂
Thank you Nicole 🙂
I’m always trying to find a new/interesting background, but it never crossed my mind to do color block! Thanks for the inspiration:)
Thank you Brittany! Glad to be of help 🙂